How to Make a Dropping Board for Your Chicken Coop – 4 Affordable Ways!

Are you tired of constantly cleaning your chicken coop to find it soiled again? Introducing a dropping board for chicken coop might be the solution you’ve been seeking. This simple addition not only makes cleaning a breeze but also helps maintain a healthier environment for your feathered friends.
But, how to make a dropping board for your chicken coop? Well, there are several approaches to this. You can make dropping board for chicken coop using plastic tarps, and wide boards. As an alternative to wide boards, plywood, or wooden boards can also be used.
I’ll try to suggest some of the easiest ways to make a dropping board for your chicken coop. Keep on reading for a more comprehensive view.
Table of Contents
How To Make A Dropping Board For Your Chicken Coop? 4 Ideal Approaches!

First thing first, let’s get to the point. I’m gonna talk about the approaches I’ve suggested in the article intro. I swear all these are the easiest DIY poop catcher ideas. Have a look and think of which one is suitable for you!
1. The Wide Board Approach
One of the most basic and cost-effective options is to utilize wide boards as your dropping board. If you want a chicken roost with a dropping board, Here’s how you can accomplish this.
Materials Needed
- Two wide boards (at least 8-10 inches wide)
- Saw (if boards need trimming)
- Screws or nails
Step-by-Step Guide
- Measure the length of your coop’s roosting area.
- Cut the wide boards to the appropriate length, ensuring they fit snugly beneath the roosting bars.
- Place the boards side by side, approximately 8 inches below the roosts.
- Secure the boards in place using screws or nails, ensuring they are level and stable.
2. The Plastic Tarp Solution
If you’re looking for an even simpler approach, you can consider using a plastic tarp. In this method, you’re gonna make a chicken roost with a tarp hammock. This method is not only inexpensive but also easy to clean and replace when necessary.
Materials Needed
- Plastic tarp (size appropriate for your coop)
- Scissors or utility knife
- Bungee cords or clips
Step-by-Step Guide
- Measure the area beneath your roosting bars.
- Cut the plastic tarp to the desired size, leaving a few inches of overhang on each side.
- Secure the tarp in place using bungee cords or clips, creating a “poop hammock” beneath the roosts.
- For added stability, you can place a wooden frame around the perimeter of the tarp.
Related Articles:
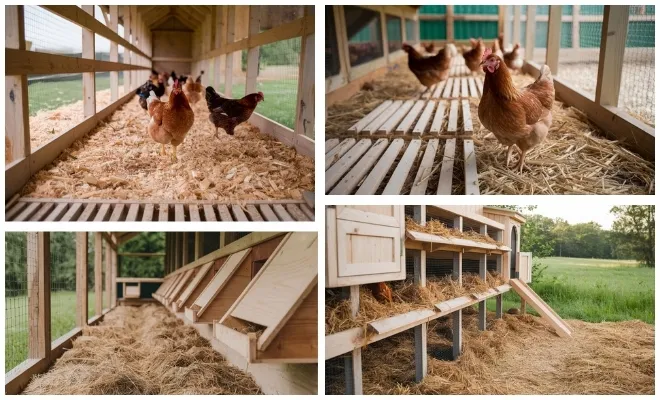
3. The Dedicated Shelf Method

If you prefer a more permanent and customized solution, consider building a dedicated shelf to serve as your dropping board.
Materials Needed
- Wooden boards or plywood and linoleum tiles (for the shelf surface)
- Lumber (for the frame and supports)
- Saw
- Screws or nails
- Litter material (e.g., pine shavings, straw)
Step-by-Step Guide
- Measure the area beneath your roosting bars to determine the appropriate shelf size.
- Construct a sturdy frame using lumber, ensuring it can support the weight of the shelf and litter material.
- Attach the shelf surface (wooden boards or plywood) to the frame, ensuring it is level and secure.
- Position the shelf below the roosting bars, leaving enough clearance for your chickens to move freely.
- Line the shelf with a litter material of your choice to absorb droppings and reduce odor.
The following video should be helpful for you in this case.
4. The Poop Tray Frame
For those seeking a budget-friendly and easy-to-clean option, consider constructing a poop tray frame using inexpensive materials.
Materials Needed
- 1″ x 5″ x 8′ board
- 1/8″ piece of plywood (or other thin material)
- Saw
- Screws or nails
Step-by-Step Guide
- Cut the 1″ x 5″ board into four equal lengths to create a frame.
- Assemble the frame by securing the four pieces together using screws or nails.
- Cut the plywood or thin material to fit snugly within the frame.
- Place the assembled tray frame beneath your roosting bars, ensuring it can be easily removed for cleaning.
Related Articles:
For chicken poop tray ideas, the following video might come in handy.
Precaution: No matter which dropping board design you go with, it’s good to cover with something absorbent. Like – lime, straw, or pine shavings. This will help soak up any liquid droppings and cut down on smells. And don’t forget to make cleaning the board part of your regular routine. Scrape or scoop off the droppings at least once a day or every other day.
FAQs
Let’s have a quick look at the Q&A below. I hope the following answers might help you to have a better understanding.
Q: How often to clean chicken dropping board?
You should clean a chicken dropping board at least once a day. But it’s even better if it’s twice a day – once in the morning and once in the evening.
Q: How wide should a chicken poop board be?
It should be as wide as the chicken coop itself. So, a specific measurement is tough to be given. In general, a chicken dropping board or poop board should be at least 8-12 inches wide.
Conclusion
A dropping board is an easy way to keep your chicken coop clean and your birds happy. While it may take a little effort to set up, the guides above make it straightforward. A well-made dropping board means less cleaning for you and a comfier home for your feathered friends.
Embrace this simple project and enjoy the benefits of a tidy, welcoming coop.


