How To Hatch Duck Eggs Without An Incubator? 10 Easy Steps!
An incubator is like a special box that helps baby ducks hatch from eggs. It copies what happens in a mommy hen’s nest, making sure the eggs stay in the right temperature and humidity. This way, the baby ducks can grow inside the eggs in the best way possible.
But how to hatch duck eggs without an incubator? Well, you need some extra attention to do that. Besides, you need a brooding bird, temperature, and humidity to build a DIY incubator. You can also follow the lamp technique to hatch eggs.
To learn more about duck egg hatching, read further for a step-by-step solution. You’ll have everything that you are expecting!
Table of Contents
How to Hatch Duck Eggs Without an Incubator? 10 Ideas And Steps You Can Follow!
Using an incubator is an easy way to ensure a successful hatching. Incubators lessen your hassle by
- Controlling the environment
- Increase hatch rate
- Disease prevention
- Allow for hatching throughout the year.
But when you lack the incubator or prefer natural incubation, here is what you should follow. Before we proceed, have a look at the video.
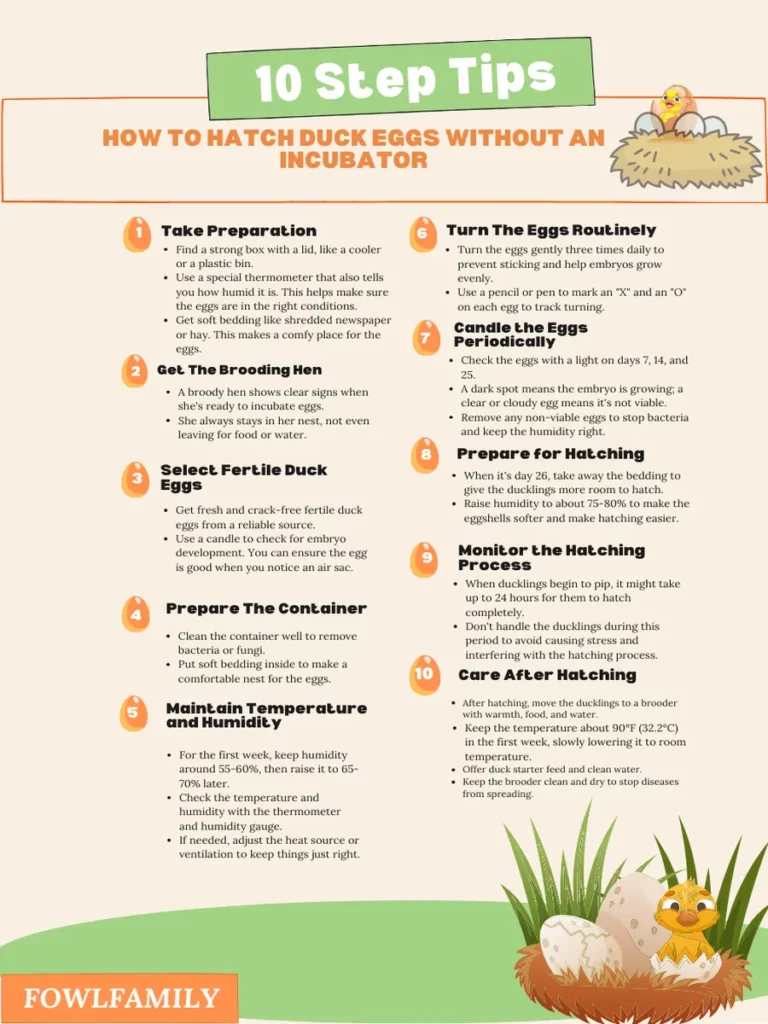
1. Take Preparation
For hatching duck eggs without the incubator, gather all the necessaries you need. For this, get –
- Find a strong box with a lid, like a cooler or a plastic bin.
- Use a special thermometer that also tells you how humid it is. This helps make sure the eggs are in the right conditions.
- Get soft bedding like shredded newspaper or hay. This makes a comfy place for the eggs.
- Have a way to give water, like a spray bottle or a shallow dish. Ducks need humidity, and this helps keep the eggs cozy.
- Keep things warm with a heat lamp, heating pad, or hot water bottles. This makes sure the eggs stay nice and toasty for hatching.
Recommended Reads:
2. Get The Brooding Hen
Get a helpful brooding hen for hatching duck eggs without using an incubator. Put the duck eggs under a broody hen for incubation.
Do it at night when the hen is sleepy. This way, she won’t notice the new eggs as much. If all is well, ducks like Muscovy can hatch around 12 to 16 eggs.
However, here is a table that says their maternity status.
| Duck Species | Performance |
|---|---|
| Muscovy | Excellent |
| Mallard and Silver Appleyard | Very Good |
| Khaki Campbell, Rouen, and Welsh Harlequin | Good |
| Black Swedish, Blue Swedish, White Layer, Golde Hybrid Layer, and Cayuga Buff | Fair |
| Pekin | Poor |
But how do you identify a broody hen?
- A broody hen shows clear signs when she’s ready to incubate eggs.
- She always stays in her nest, not even leaving for food or water.
- Her feathers get puffed up, making a comfortable space for the eggs.
- You might also hear her making a low, growling sound, showing how protective she feels.
3. Select Fertile Duck Eggs
- Get fresh and crack-free fertile duck eggs from a reliable source.
- Use a candle to check for embryo development. You can ensure the egg is good when you notice an air sac.
4. Prepare The Container
- Clean the container well to remove bacteria or fungi.
- Put soft bedding inside to make a comfortable nest for the eggs.
5. Maintain Temperature and Humidity
- Keep the temperature steady at 99°F (37.2°C) all through incubation. According to Cornell University Veterinary Medicine Research, you can set the temperature for hatching at 37.5°C or 99.5°F.
- For the first week, keep humidity around 55-60%, then raise it to 65-70% later.
- Check the temperature and humidity with the thermometer and humidity gauge.
- If needed, adjust the heat source or ventilation to keep things just right.
6. Turn The Eggs Routinely
- Turn the eggs gently three times daily to prevent sticking and help embryos grow evenly.
- Use a pencil or pen to mark an “X” and an “O” on each egg to track turning.
7. Candle the Eggs Periodically
- Check the eggs with a light on days 7, 14, and 25.
- A dark spot means the embryo is growing; a clear or cloudy egg means it’s not viable.
- Remove any non-viable eggs to stop bacteria and keep the humidity right.
8. Prepare for Hatching
- When it’s day 26, take away the bedding to give the ducklings more room to hatch.
- Raise humidity to about 75-80% to make the eggshells softer and make hatching easier.
9. Monitor the Hatching Process
- When ducklings begin to pip, it might take up to 24 hours for them to hatch completely.
- Don’t handle the ducklings during this period to avoid causing stress and interfering with the hatching process.
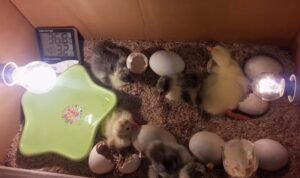
10. Care After Hatching
- After hatching, move the ducklings to a brooder with warmth, food, and water.
- Keep the temperature about 90°F (32.2°C) in the first week, slowly lowering it to room temperature.
- Offer duck starter feed and clean water.
- Keep the brooder clean and dry to stop diseases from spreading.
4 More Ideas For Hatching Duck Eggs Without An Incubator
Except for the general point of view, here are some other ideas you can utilize for hatching eggs.
1. One-time Hand Warmers
Using such a tool helps you hatch eggs without an incubator. The job is to give heat for a certain period, so you just have to alter them frequently. What we do is change the hand warmer every 10 to 12 hours.
The easy process is to put your hand warmers and eggs in a sock or properly wrap them with a towel. It’s necessary to keep them warm in a small space.
2. Keeping Heated Rice
Creating a natural homemade duck egg incubator can involve a clever and effective idea with rice. Here’s how:
- Keep the uncooked form of rice in the bag or sock. Then, use the microwave for a few minutes to heat it.
- Make sure the rice feels warm when you touch it.
- Cycle the rice along with duck eggs as you need to maintain a temperature of around 90°F.
3. Including The Heating Pad
The incubation process with the heating pad can come in handy. Here’s how:
- Dampen a clean washcloth with hot water to ensure it’s just slightly wet.
- Throughout the day, keep moistening the washcloth to uphold a warm and humid setting for the eggs.
- Check for any mold or mildew issues that could harm the eggs.
- For wrapping eggs, towels are best. It creates a protective layer between your heating pads and eggs.
4. Homemade Incubator
A DIY incubator or homemade version is completely different from an incubator but works effectively.
How about making a homemade incubator with a lying cooler?
Use a baking tray or an open container in the cooler for water. We use it to maintain the humidity level in the incubator. Halfway filling and adding a mesh tray is what you need now.
For heating, use a lightbulb and tape it to the cooler’s top. You can set up a heat lamp in an unused greenhouse.
If the cooler is airtight, don’t seal it completely. Ensure the airflow is there. Before putting duck eggs in, ensure the proper heat level and cooler. Plus, ensure you maintain and monitor the temperature.
Check this video! It might help you out!
All You Need to Know About Hatching Ducklings

Hatching duck eggs is a great way when the time is spring to summer. Well, the hatching time is after 26 to 32 days of incubation.
However, the incubation period can vary slightly depending on the duck breed and the environmental conditions.
Here is a timeline of the duck egg incubation process:
- Days 1-7: The embryos develop their heart and circulatory system.
- Days 8-14: The embryos develop their limbs and internal organs.
- Days 15-21: The embryos develop their feathers and continue to grow.
- Days 22-28: The embryos pip, which is when they start to break through the eggshells.
- Days 28-32: The ducklings hatch.
For the mother duck, ensure they have enough healthy diets and water sources. And the general rule of thumb is monitoring and observing those days when you decide to hatch eggs without an incubator.
Related Readings:
Final Word
Whoever is trying to hatch duck eggs without an incubator can now do it in the house. It’s quite easy when you have basic knowledge like gathering things, getting a broody hen, maintaining temperature, and preparing for hatching.
I also included some other valuable ways to hatch eggs without investing in the incubator. Not everyone can afford such an incubator. So why not follow the natural process like hand wormer, heated rice, heating pad, or DIY incubator? Try my guidelines, and be happy with your baby ducklings!