How To Create A Dust Bath For Your Chickens? 8 Proper Steps!
Chickens love a good dust bath—it’s their version of a spa day. Creating a dust bath for your feathered friends is not only easy but also crucial for their well-being.
But how to create a dust bath for your Chickens? Choose the right spot, gather materials, set up the bath, and enjoy seeing them bathing. You can add some herbs to the dust bath, such as lavender, rosemary, or mint. These herbs have natural pest-repellent properties. And be sure you cover the dust bath with a tarp at night during cold environments.
With a little effort, you can create a dust bath that your chickens will love. Let’s talk about making dust baths for such feathered friends in detail!
Table of Contents
How To Create A Dust Bath For Your Chickens? A Complete Guideline!
Keeping your chickens happy and healthy isn’t just about feed and water. A critical element is providing them with a dust bath. This natural haven offers a surprising array of benefits, from fighting pesky parasites to promoting fluffy feathers.
This guide will walk you through everything you need to know to create the perfect “dust bath” for your feathered friends.
Step 1. Choosing the Right Location for Dust Bath
Choose a well-drained spot to prevent water accumulation. It creates a comfortable dust bath environment.
Find a balance between sunlight and shade for a pleasant dust-bathing experience. Select a location easily accessible to all hens. It promotes inclusiveness and avoids competition for dust bath space.
Here is a detailed section for you!
- Sunlight and Shade: Ideally, choose a spot with a mix of sun for warmth and dust-drying, and partial shade for cooling after a dusty romp. Avoid exposing the bath to full sun all day, as it can become uncomfortably hot for your chickens.
- Drainage: Pick a well-drained area that doesn’t get waterlogged. This prevents puddles and reduces the risk of mosquito breeding. Sandy or gravelly soil offers good drainage, while clay requires extra attention to avoid mud.
- Shelter: Ensure the bath is protected from wind and rain. A light roof of corrugated plastic or plywood can keep the dust dry and inviting.
- Location: Place the bath within easy reach of the coop but not directly underneath it. This prevents droppings from contaminating the dust and keeps the coop area cleaner.
Step 2. Things to Add for Chicken Dust Bath
What is the best material for a chicken dust bath? Select fine soil or sand that is soft on feathers. It provides an ideal base for the dust bath.
Construction-grade sand, also known as all-purpose sand, is the ideal choice. Choose coarse sand rather than superfine sand, as fine sand can cause plant damage if ingested. Avoid using play sand in the chicken coop or dust bath as it is often treated with chemicals.
You can integrate diatomaceous earth for natural pest control. It’ll keep your chickens free of unwanted intruders.
Also, enhance the dust bath with herbs or natural additives to create a fragrant and beneficial environment. You can include –
- Basil
- Parsley
- Lavender
- Oregano
- Mint
- Lemon Balm
- Marjoram
- Sage
Aside from that, A chicken dust bath can be made from any large, wide, shallow container.
Some great examples include –
- Galvanized tubs (15 gallons or larger recommended)
- Wood or plastic crates
- An old garden bed
- Kiddie pool or children’s sandbox
- A giant cat litter box, and
- Sturdy plastic tubs or totes.
- You could also lay down logs, wood boards, or large rocks on the ground to frame out a dust bath area.
Step 3. Building the Dust Bath
Design the bath based on your flock size. Aim for 2-3 square feet per chicken for comfortable dust-bathing.
Create a shallow pit (6-8 inches deep) lined with rocks to prevent erosion. Or use a large container like a kiddie pool or old tire.
Provide a removable cover. For example – plywood or corrugated plastic, to protect the dust from rain and wind.
Step 4. Modifying the Dust Bath Area Frequently
To adjust the dust bath area based on chicken preferences, consider these tips:
- Location: Choose shaded spots. For example – under a tree or covered area, to prevent overheating during hot weather.
- Soil Type: Chickens prefer loose, fine, or sandy soil. Mix sand with your dirt for a suitable bathing mix. Add lime or wood ash for extra benefits.
- Size: Ensure the dust bath area is large enough for all chickens at once. Aim for at least one square foot per chicken.
- Depth: Make the dust bath at least 6 inches deep. Let them fully submerge and fluff dust into their feathers for parasite removal.
- Maintenance: Keep the area clean by removing debris and pests regularly. Add fresh sand or dirt as needed. If you ask how often do you clean a chicken dust bath? Do it regularly or every few weeks.
Step 5. Clearing Parasites or Mites from Dust Bath Area
To eliminate parasites or mites from your chicken’s dust bath area, sulfur can be a helpful solution.
According to NCBI, the use of sulfur in hanging bags resulted in a significant reduction of mites. It treats birds by either 95% or 97% within one week of deployment. After two weeks, mite counts on these birds dropped to zero.
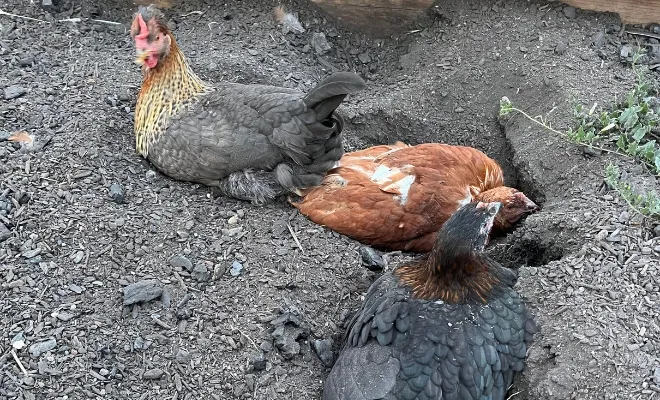
Chickens naturally dust themselves by sitting in a box filled with dust. It includes fine dirt, sand, diatomaceous earth, insecticides, and other powdery substances. They do this to remove parasites, exhibiting a natural behavior.
Step 6. Observing Chicken Behavior
Understand the signs that your chickens are ready for a dust bath. Foster good habits by observing and encouraging proper dust-bathing behavior in your flock.
Be sure you avoid conflicts by providing enough space to accommodate all of your chickens during dust-bathing sessions.
You may wonder, should a chicken dust bath be in the sun? Yes, they love to take the dust bath in the sun.
Step 7. Common Mistakes to Avoid When Making Dust Bath Area
Avoid harmful additives that may harm your chickens or compromise their health.
Be proactive with regular maintenance. Prevent stress and competition by providing ample dust bath space. Creating multiple dust bath areas for your chickens is what you can go for!
Step 8. Consulting a Veterinarian
In certain situations, it’s wise to ask a vet about your chickens’ dust baths:
- Unusual Behavior: If your chicken is overly obsessed with dust bathing, it may signal stress or mites. Also, abnormal dust bath activities, like frantic digging, need vet attention due to internal parasites.
- Persistent Pest Issues: While diatomaceous earth helps, severe pest problems may need vet treatment. Signs of feather loss or skin issues around the dust bath need vet attention and treatment.
- New Additions to the Flock: Consult your vet before introducing new chickens to prevent parasite spread.
- Uncertainties about Bath Composition: If unsure about soil, sand, or additives, consult your vet for safe recommendations. Some commercial dust baths may have chemicals; a vet can advise on safe options.
Want to know more about “How do I get my chickens to use their dust bath? Here is a video for you!
Do I Need to Offer Dust Bath for Baby Chicks?
Providing a dust bath for baby chicks is not necessary as they are not yet engaging in dust-bathing behavior. Adult chickens typically begin dust bathing around 2 to 3 weeks old.
Once your chicks reach that age, introducing a dust bath can be beneficial for their overall well-being.
Related Articles:
Why Do Chickens Need Dust Bath? 4 Benefits!
Dust baths are essential for chickens. So I would suggest you make one for your feathered flocks too. Here is why you should make a dust bath for the chickens.
1. Hygiene and Feather Care
Dust acts like a tiny brush, cleaning feathers by absorbing dirt, oils, and parasites. It also maintains insulation and water resistance. It aids in preening by loosening dirt for easy removal.
2. Pest Control
Fine dust suppresses mites and lice by suffocating and dehydrating them. It ensures natural pest control and reduces the need for chemicals.
3. Skin and Health Benefits
Dust baths soothe irritated skin and provide relief from bites or dry conditions. They also absorb excess skin oil, preventing feather dullness and promoting overall feather health.
4. Behavioral Benefits
Dust bathing is a calming activity that relieves stress and boredom for chickens. It promotes social interaction and bonding within the flock.
Related Readings:
FAQs
Here are some relevant queries about creating a dust bath for chickens. Make sure you check to get some additional information.
Q. How deep should a chicken dust bath be?
A chicken dust bath should be at least 6 inches deep. It allows chickens to fully immerse themselves for effective parasite removal.
Q. What age do chickens start dust bathing?
Chickens typically start dust bathing at around 2 to 3 weeks old. This is because it’s a natural behavior ingrained in them from a young age.
Q. Is sawdust good for a chicken bath?
Sawdust is not ideal for a chicken dust bath. Because it can be too fine and may cause respiratory issues for the chickens.
Q. Is potting soil OK for a chicken dust bath?
Potting soil, without added fertilizers or chemicals, can be suitable for a chicken dust bath. It provides a natural and comfortable environment.
Q. How long should I let the chicken have a dust bath?
Allow chickens to dust bath for at least 15 to 30 minutes. Make sure they have sufficient time to engage in this essential and enjoyable behavior.
Conclusion
So, how to create a dust bath for your chickens? In summary, creating a carefully designed dust bath is vital for the well-being of chickens. Choosing the correct location, gathering appropriate materials, and building a space tailored to their liking is what they need.
Regular care and observing chicken behavior are crucial for maintaining an effective dust bath. Following these guidelines establishes an environment that meets their natural needs. It will also ensure cleanliness, pest control, and overall satisfaction for your feathered friends.